
Mar 13
Rob
1. INTRODUCTION
These procedures are loosely based on Australian Fast Jet operations circa 2010. TGW Carrier operations are detailed elsewhere.
So why does TGW have Fighter Standard Operating Procedures (SOPs)? The primary reason for implementing TGW SOPs is to enhance the immersion of operating in DCS World, which is in turn designed to enhance the enjoyment and satisfaction we gain from our virtual combat experience. That is, this document is another way of getting what we want out of our hobby: fun!
For those who come to TGW with an interest in combat aviation, there is a satisfaction to be found in conducting a mission whilst the potential complexity of a fighter formation is running like clockwork around you. Being a functional part of a complex mission in DCS world is something to be proud of. And good virtual air combat operations are not simple without procedures to follow.
There is no absolute requirement that these procedures be implemented on any flight, except for your own desires for immersion in our hobby. In that way, there are no negative consequences for not following these SOPs during regular TGW server operations.
If you are a TGW member or casual visitor who chooses not to become proficient in these procedures, it will not stop you from flying on TGW servers, with one potential exception: our regular ‘Mission Night’. Commanders (mission planners) may choose to mandate the use of these procedures for these events. It is expected that to participate in such missions, Virtual Pilots (VPs) will at least do their best to comply with these procedures.
Even if you don’t get it perfect on a mission night, that won’t result in you being banned from missions so long as you are trying. Mission nights are about our group learning and having fun together after all. The reason why we are looking for commitment to these SOPs for mission nights is fairness: some of our core VPs who invest their time and money into TGW and our server, want to maximise immersion and our mission nights are mostly designed to cater for those VPs. More ‘casual’ TGW members are substantially catered for with everyday server mission.
We hope you find the information in this document useful.
2. DEFINITIONS
Combine Formation: Two or more formations operating as one ‘large’ formation. In a combine formation, the FL of the first element is the Formation Leader. Not to be mistaken for a package, where multiple formations may operate toward aligned objectives, but one FL does not assume the duty to direct all formations.
Element Lead: The occupier of the #3 position is an element lead.
Element: In a multi-ship formation, an element is a unit of two aircraft. In a 3-ship, the second element is a single (#3). The term ‘element’ is used in lieu of ‘pair’. In a combine formation, an element is the members of a discreet ‘formation’.
Flight Lead: A ‘flight lead’, abbreviated as ‘FL’, is the leader of a formation and the occupier of the #1 position. The terms FL and #1 are interchangeable.
Formation Leader: The Formation Leader is the FL of the lead element in a combine formation.
Formation: Multiple aircraft operating together as a unit. Formations may comprise of similar performing mixed aircraft types (e.g. F-18 and F-16) if absolutely necessary, however leads should not seek to combine types with dissimilar performance into the same formation (e.g. F-14 and A10). Combine formations should be used for dissimilar performance types.
Multi–ship: A ‘multi-ship formation’ is a formation comprised of more than 2 aircraft. The terms ‘3-ship’ or ‘4-ship’ may be used to describe 3 or 4 aircraft multi-ship formations.
Pair: A formation is referred to as a ‘pair’ when it is comprised of 2 aircraft.
Stud: A programmed frequency channel in the aircraft radio.
Virtual Pilot: A Virtual Pilot is a DCS player filling a pilot role. The abbreviation VP is used by TGW.
Wingman: A holder of a #2, #3 or #4 position is a wingman.
3. FORMATION POSITIONS AND ROLES
#1 or Flight Lead. The flight lead (FL) is responsible for the conduct of the formation, including nominating who fills what positions and roles within the formation.
The flight lead is usually the more experienced pilot in the formation, or someone who is under training for the position. Even when under training, the Flight Lead is responsible for making decisions and leading the formation; formations are not lead from the rear.
No ‘qualifications’ are needed to be a FL. However, to be a good one you must strive to be a stable, predictable and thoughtful leader for your flight. Everyone is encouraged to give FL a try when they feel up to it.
Despite the following position descriptions, the FL may place VPs in any position they desire for any reason (such as exposure and experience building).
#2 Wingman. The first wingman, #2, is responsible to the FL.
Their collision avoidance responsibility is to avoid #1.
In a multi-ship formation, it is preferrable for the most experienced of the wingmen to occupy #2, to allow the FL an easier time in managing his element on top of flight lead duties. This also makes it easier for #3 to have a predictable wingman to follow.
To be a good #2 follow this simple maxim:
BE THERE, DON’T RUN OUT OF FUEL, DON’T HIT LEAD, SPEAK BY EXCEPTION.
Be there means be in the position you are meant to. The middle two are self-explanatory. The last one means talk only when you must. There is a great Dos Gringos song which sums up the mentality, that is a wingman who just says ‘2’, ‘Lead you’re on fire’. A thinking wingman thinks about what they are doing and does not try to second guess lead unless it is obvious something is wrong.
In the end, as a wingman if you can follow this maxim and are regularly getting weapons on target, you are ready for FL.
#3 Element Lead. If present, #3 is the deputy formation lead. #3 is also the second element lead. In this way, it helps to be able to fill the role of a FL for a pair to be a #3, especially in complex missions. The #3 is responsible to #1. Their collision avoidance responsibility is to avoid #1 and #2.
In a multi-ship formation, having the second most experienced of the FLs occupies #3 to allow #1 an easier time in managing his element on top of flight lead duties. In some cases, the most experienced FL will occupy #3 to supervise a #1 who is under training or building skill.
#3 is responsible for the ‘lead’ of their wingman (#4) any time the formation is split into two elements. #3 as Deputy Flight Lead, also takes over running the formation if #1 disconnects, gets shot down etc.
As formations do not renumber, #3 always keeps the callsign #3 even if they step up to lead the formation. If #3 assumes FL status, they will direct #2 on what to do.
To be a good #3 follow this simple maxim:
BE THERE, DON’T RUN OUT OF FUEL, DON’T HIT THE LEAD ELEMENT, SPEAK BY EXCEPTION AND ONLY IN A WAY THAT HELPS LEAD.
A thinking #3 who doesn’t need to be micro-managed by #1 is ready to lead a multi-ship formation.
#4 Wingman. The #4 wingman is typically occupied by the most inexperienced wingman. They are responsible to #1 via #3. Their collision avoidance responsibility is to avoid #1, #2 and #3.
To be a good #4 follow this simple maxim:
BE THERE, DON’T RUN OUT OF FUEL, DON’T HIT LEAD, SPEAK BY EXCEPTION.
A successful #4 can meet these goals most of the time. A #4 who is ready for #2 occasionally gets their weapons off.
4. TGW FORMATION CALLSIGNS
Training Callsign. The standard training formation callsign at TGW is ‘CRIMSON’. If you are a non-combat flight on a training server, you are required to use this callsign to allow other formation members to identify you easily. Crimson callsigns must not be interfered with or engaged without express invitation. Banning or Kicking will result in uninvited interference with CRIMSON callsigns.
Operational Callsigns. If you are a combat flight on either a training or ‘operational’ TGW server, the preferred TGW formation callsigns are based around the warrior concept which is the motif of TGW. We encourage VPs to use preferred TGW callsigns as a means of building group identity. Preferred TGW callsigns are as follows:
WARRIOR, ROMAN, DEVIL, SABRE, SWORD, CUTLASS, KNIGHT, SAMURAI, SPARTAN, HOPLON, KATANA, PIRATE, MONGOL, TAIAHA, NULLA, WOOMERA, SHIV, RAZOR, DEMON, VENOM, TIGER, NINJA, SHOGUN, WEDGETAIL (AWACS), BUNDY (AWACS).
Other Callsigns. Other appropriate callsigns may be used at the discretion of members for server operations, except on Mission Nights where the Mission Commander will assign callsigns that comply with the list in this SOP.
5. FORMATION COMMUNICATION FREQUENCY
Formation Common. The Flight Lead must nominate an appropriate frequency to act as the ‘Formation Common’ frequency. The Formation Common (Form Common) is the frequency which in inter-formation comms should occur on. Flight leads must ensure your designated Form Common is not the same as AWACS, Tankers or other formations.
If, at any time during formation operations, you lose radio contact with your lead or wingmen, go back to form common and try and raise them there.
Formation Common frequencies are best selected from the TGW Blue SOP COMMS AND TAC CARD (below), which is included in all TGW servers as a kneepad document.
Red 1 is the default TGW Formation Common, if no other allocation is made.

6. AIR TO AIR TACAN
AA TACAN Plan. Whilst not essential, especially with DATALINK in operation, it is advisable for the FL to nominate an air-to-air TACAN plan for your formation. For missions beyond AWAC coverage, you will most likely need air-to-air TACAN at some point.
Air to air TACAN works by the lead setting a frequency channel, and wingman setting a channel split by 63 from lead (on the same X or Y band). As air-to-air TACAN uses the same frequency bands as the datalink, there are some restricted channels as shown below.
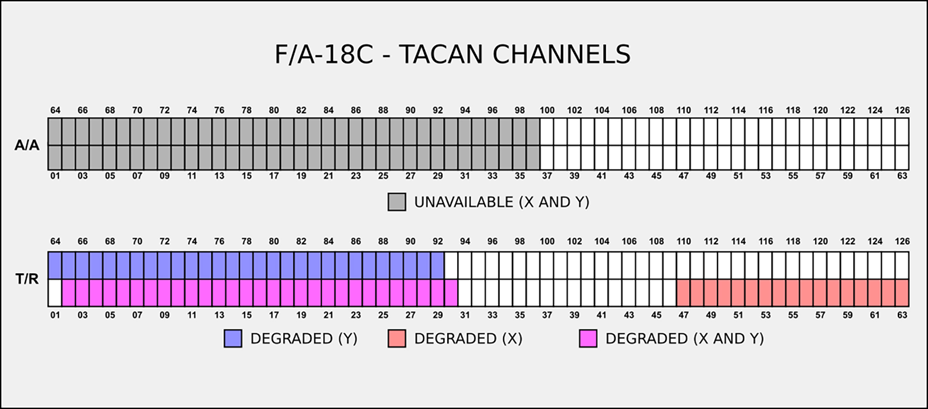
TGW Default AA TACAN. The TGW default AA TACAN pairing is per the default SOP comms, Red 1:
#1 37X
#2 100X
However, any of the white channel pairs in figure 1 may be used and leads must ensure whatever channels they use, there are no assets in the theatre on the same channel (e.g. carriers, bases, tankers, other formations). Refer also to the pre-designated channels on the SOP COMMS card.
Multi-Ship TACAN Plan. For multi-ship, the air-to-air TACAN plan should account for #3 and #4 to take distance from each other, as well as #1 if needed. An example of a multi-ship formation TACAN plan is:
#1 37X
#2 100X
#2 37Y/100X
#4 100Y/100X
7. FORMATION BRIEFING
Brief. The FL is responsible for the briefing requirements for their formation. What is briefed will depend upon the mission and who is in a flight. With an experienced flight, it can be as simple as ‘Formation procedures are SOP, CAP at WP1’, right down to a full-length mission brief. Experienced wingmen (that is, those who know this SOP) will not need much briefing. When training though, it pays to focus on some briefing elements to maintain and develop the skills of your formation members.
Remember to detail your comms and TACAN plans, which can be done verbally or with Kneepad documents.
In the formation brief ensure weapons and targeting is adequately addressed.
8. RADIO TERMINOLOGY
Frequency Changes. A typical radio frequency change will sound like the following:
Lead: ‘Crimson, Comm one, Push Stud one’
Breaking this example down, ‘Comm one’ refers to the number 1 radio in both the F-18 and F-16 (which is UHF only in the F-16). As might be expected, if ‘Comm 2’ were said, that refers to the number 2 radio (which is a VHF only radio in the F-16). Alternative terminology is ‘Box 1’. The terms ‘box’ and ‘comm’ are interchangeable in this context.
The term ‘Push’ means change to a different frequency and expect a frequency change check-in from lead when you get there. If the term ‘Switch’ is used, change to the frequency directed but FL will not check you in. Be alert for the whether it is a switch or push.
‘Stud one’, refers to the frequency you need to change to. In this case, it is a direction to set the number 1 pre-set on the appropriate radio. Alternative terminology is ‘push 1’, where the word STUD is omitted.
In some cases, instead of a frequency you may be given a colour followed by a number. In such a situation lead is referring to your comms card; you will have been provided with a comms matrix by lead and this card will provide the frequencies in the list. An example call may be ‘Crimson, comm 1 push red one’.
If the required frequency is not pre-set in your formations’ aircraft, lead may state the frequency instead of STUD. For example, ‘Crimson, Comm 1 push two six two decimal zero’. If a single decimal zero is stated, this means the following 2 zeros are entered by the pilots switching to that frequency.
If you are given a Stud which is not loaded in your jet but is on your kneepad, a good wingman will get the frequency (if they can) from their kneepad. As the comms flow is relatively predictable, this is usually not an onerous task for an experienced wingman.
Use of ‘Channel’. In some air arms or aircraft types, a STUD is defined as a UHF radio pre-set, where as a Channel is a VHF radio pre-set. Examples are the F-111C, which only had 1 UHF and 1 VHF radio. This allowed the omission of the terms comm 1 or 2 from radio switching calls. TGW uses the term ‘STUD’ for indicating all pre-set frequency channels irrespective of whether they are UHF or VHF.
Frequency Change Check-in. After a comms ‘push’, the FL will perform a check-in on the new frequency. Before starting the check-in, Lead will allow a few (5-10) seconds for everyone to get on frequency. Wingmen must not assume the delay in initiating the check-in is due to lead failing to be on the frequency; that is, wingmen must not jump ahead in the check in. Wait for lead to initiate the check-in, noting there will be a delay. A check-in would proceed as follows:
Lead: ‘Crimson, Comm one, Push Stud one’
(After 5-10 seconds delay to allow for formation to get on frequency and select the right comm to transmit on)
Lead: ‘Crimson 1’
#2: ‘two’
#3: ‘Three’
#4: ‘Four’
Remember, wingmen do not use the formation callsign on frequency change check-ins.
9. START-UP
Individual Start-up. Upon loading in, individually perform the start-up procedure and ensure you have your radios set up with ATC on COMM1, and the briefed FORMATION COMMON on COMM2. Have COMM2 active (set to transmit) and wait for lead to conduct a formation check. A formation check is the first comms between the formation and differs to the conduct of a check-in post a frequency change (detailed later)
Formation Check. A formation check is conducted to ensure all aircraft are ready to proceed with the flight. The formation check proceeds as follows:
Lead: ‘Crimson, check’
#2: ‘Crimson two’
#3: ‘Three’
#4: ‘Four’
Note that only #2 says the formation callsign. 3 and 4 simply say their position. This is different to a check-in, where all wingmen simply state their position numbers.
During a formation check, if the wingman proceeding you is not heard 10 seconds after the preceding formation member, subsequent wingmen may reply. This may occur if a wingman is unserviceable (CTD, technology issues). Note how if #3 is the first to respond to lead, they would use the formation callsign in that case. For example:
Lead: ‘Crimson, check’
#2: (silence 10 seconds +)
#3: ‘Crimson Three’
#4: ‘Four’
After the formation check, lead will push the formation to the appropriate ATC frequency.
ATC Communication. Lead will perform the necessary ATC comms to get the formation taxiing. As the taxi progresses, expect other frequency changes and check ins.
If at any point during taxi, a wingman requires to talk to lead, ensure it is done on the formation common frequency (which is best to keep as comm 2). Make every effort to keep formation comms on this radio/frequency and keep the ATC channel clear (the ATC radio will become the big picture radio when airborne).
Lighting Setup. Prior to taxi is a good time to ensure your aircraft lighting is the same as your Flight Lead. If lead is unlit, you must be too.
10. TAXI PROCEDURE
NWS and Brake Check. Once lead moves forward to taxi, each wingman in sequence begins to taxi. As you start to taxi forward, do so slowly and do a brake check (performing quick brake tap to ensure they are working). Immediately after, engage NWS and check steering with a quick left right weave, before continuing taxi behind lead.
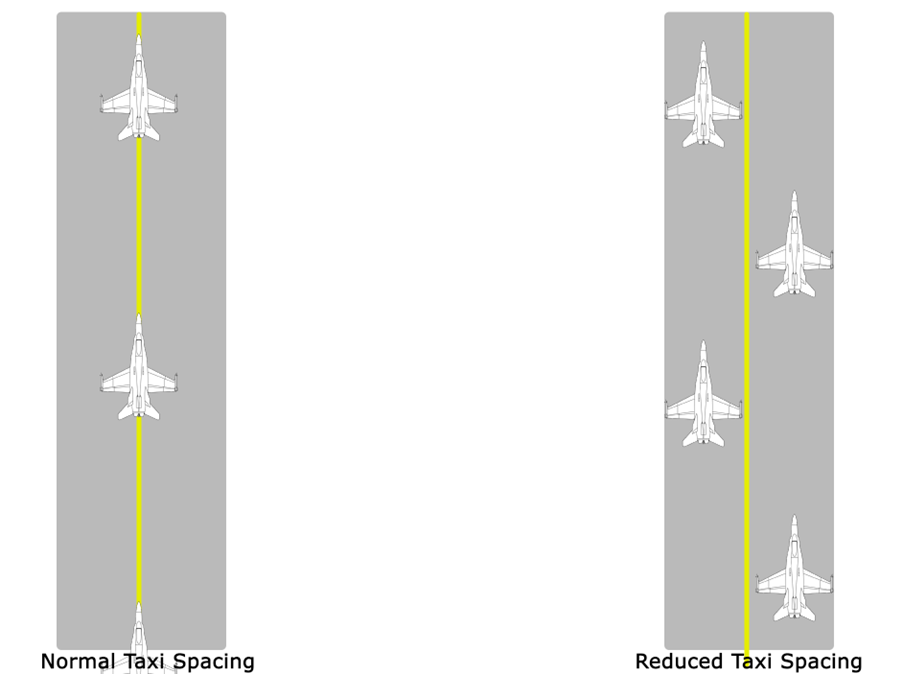
Normal Taxi Spacing. Taxi out behind lead to keep appx 1.5 aircraft lengths between your nose and leads tail if lead is taxiing on the taxiway centreline. Lead being on the taxiway centreline indicates to the formation that normal taxiway spacing is required. Typically, such spacing is also used if a stream take-off is anticipated. In this way, lead can roll straight on to the runway and begin take-off, as can each wingman without needing to stop.
Reduced Taxi Spacing. If lead offsets themselves to one half of the taxiway, they are telling the formation they want a reduced taxi spacing between the formation. This is often used when a pairs take-off is expected for a pair (note 4 ships do not do pairs take-offs due to wake considerations and proximity to the runway edges).
Upon seeing lead offset themselves, #2 should offset themself to the opposite half of the taxiway to lead and reduce the longitudinal spacing with lead to half the normal spacing. #3 would be on the same side of the taxiway centreline as lead, but at the normal spacing from lead of 1.5 aircraft lengths. #4 will then position themselves on the opposite side of the taxiway centreline to lead and #3, (that is, behind #2) at the normal spacing from #2 (1.5 aircraft lengths).
11. LINEUP
Rolling Take-Off (No Line-Up). Lead may elect to enter the runway and keep rolling. In this case, wingmen should do the same by engaging MAX afterburner at the required interval after lead does so, per the stream take-off SOP.
Pair Line-up. Lead is to position themselves in the middle of the downwind side of the runway and come to a stop. In nil wind, lead is to take the opposite side of the runway to which they entered. #2 lines up on the middle of the upwind/opposite half of the runway, in line with the echelon longitudinal line; looking along the leading edge of leads wing.
Battle Three. FL and #2 line-up as per a pair. #3 positions themselves on the runway centre-line with their nose in line with #2’s afterburner. #1 and #2 may take-off as a pair, but in this case #3 must conduct a 10 second stream. In the alternative, the entire formation can conduct a 5 second stream.
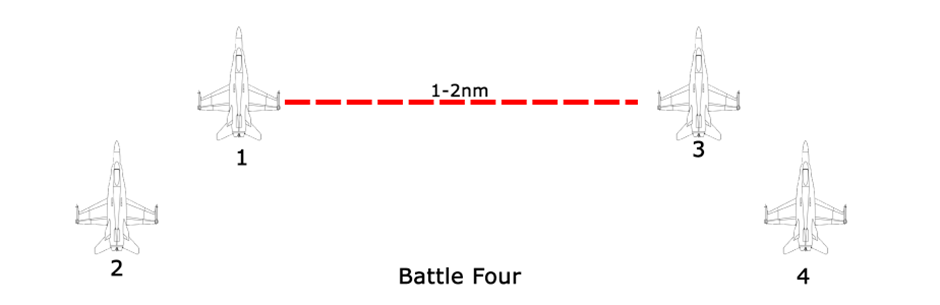
Battle Four. Lead lines up with their outside wingtip on the outer edge of the runway. #2 is on the echelon line with their wingtip on the centreline. #3 is on the same side of the runway as #1, with their wingtip on the centre-line to keep them clear of #1’s exhaust. #3 should be on #2’s echelon line. #4, on the same side of the runway as #2, puts their wingtip on the runway edge and lines up with the echelon cue of #3. Only stream take-offs (minimum 5 second interval) are flown from battle four. A pair followed by a 10 second single stream may be flown by a 3-ship formation.

Once lined up, perform the line-up checklist (Pins, Trims, Canopy, Config, Controls). Do not set the park brake on the runway. Ensure the radio which has Formation Common is set to transmit.
12. TAKE-OFF
Pairs Take-off. On leads radio command ‘CRIMSON, Run Up, Go’, whilst holding the brakes #1 and #2 run up to 80% N1 and perform a final control check. When #2 is ready, call #1 on the radio and say ‘2 thumbs up’. #1 will reply with a countdown to brakes release:
#1: ‘Three, Two, One, BRAKES’
On the word ‘Brakes’ both aircraft simultaneously release brakes and apply full afterburner (full power in the A10C). Immediately after setting full afterburner, #1 reduces to mid-range afterburner (reduces RPM ~5% in the A10C). This is designed to give #2 power margin to allow for catchup if required. Setting max or full A/B is to ensure when in VR you get into burner without needing to look down.
If #2 has insufficient power to catchup during the take-off roll, make a ‘Revs’ call:
#2: ‘Two, REVS’
Upon receipt of a Revs call, #1 MUST reduce the power by a sufficient margin to allow #2 to catchup. Caution though; do not make excessive reductions (such as out of burner) or you may cause #2 to overshoot.
Each aircraft conducts a take-off on their side of the runway, with #2 attempting to maintain the echelon line throughout. As #1 begins to rotate, #2 should follow and look to get airborne at the same time. Place lead on the horizon and prepare for LG and Flap retraction (action these when you see #1’s gear start to retract).
Stream Take-off. For a stream take-off, run up on the brakes to 80% upon leads ‘Run-up, Go’ call if one is given. If no call is given, run up as the aircraft ahead of you rolls. If conducting a stream from a rolling take-off, apply maximum power/afterburner at the required interval after lead has done so.
As the preceding aircraft rolls, begin counting down until the stream interval, then simultaneously release the brakes and apply maximum power / full afterburner. If you are rolling from a position off the centreline, aim for the centreline at the far end of the runway. Do not try to intercept the centreline immediately after starting to roll, or loss of control may result.
After Take-Off. After a positive rate is established, retract gear and flaps as soon as possible. Lead will aim for a standard climb (350 KCAS F-18/F-16, 250KCAS A10C) but may call for a different speed. Flight leads in A10C must not climb at full power, to allow wingmen the ability to catch up. Wingmen are to remain in or join to echelon formation after take-off. A radar lock of the preceding aircraft should be used by wingmen to facilitate an expeditious re-join. Once called or signalled by lead, wingmen ease out to combat/arrow formation.
13. FORMATION POSITIONS
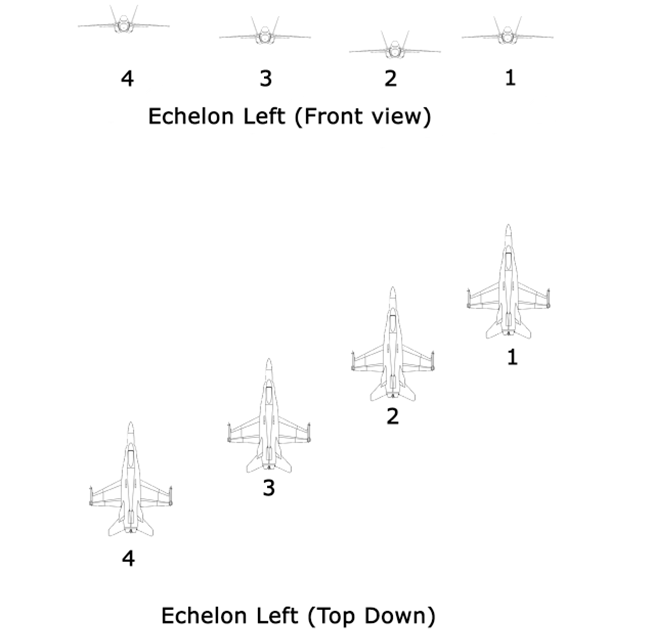
Echelon. Called Parade by the USN. Echelon is the standard formation in the terminal area (that is, close to the airfield).
F-18 Echelon. The vertical and forward/aft cue is the wingtip form light sitting just aft and under the LEX fence. When at the right spacing, the pilot will be looking across the burner cans. At night (unaided by NVG) the correct cue is the form light sitting on under the LEX navigation light.
F-16 Echelon. The vertical and forward/aft cue is the forward tip of the missile rail sitting just under the intake nav light. When at the right spacing, the pilot will be almost looking across the burner can. At night (unaided) the correct cue is the form light sitting on under the intake navigation light.

Figure 5. F-16 Echelon Formation Cues
A-10 Echelon. The vertical and forward/aft cue is the wingtip tip sitting just aft of the forward fuselage form light. When at the right spacing, the opposite side rudder hinge will be touching the back edge of the closest rudder. At night (unaided) the correct cue is the nose form light sitting on under the wingtip form light.
Multi-Ship Echelon. Four aircraft in echelon is difficult to do well in DCS. Leads should ensure turns are kept to a low angle of bank. Be predictable and stable.
The forward/aft cue for multi-ship echelon is based on lead for each aircraft. The spacing cue is based on the next highest formation member. The vertical cue is to sit as high as is necessary to keep sight of #1. In this way, #3 can be expected to position vertically so the pilot can see FL. Similarly, #4 will position vertically slightly high relative to #3 so FL can be seen.
Combat Arrow. This position is also called either Combat, Arrow, or Combat Arrow; it all means the same thing. In this formation, #2 is permitted to move about a ‘cone’ to the aft and side of the FL. The cone is between the FL’s 6 o’clock position around to the 4:30/7:30 position (roughly 45 degrees behind the abeam of lead). #2 is required to maintain between 250ft and 1000ft spacing from lead in this cone (red radials, between the blue arcs in figure 5). Vertically, #2 should match leads altitude. Normally, #2 will be on the right side of #1 in combat, however; #2 is permitted to operate on the left if required, at #2’s discretion (no permission needed to change sides). If #2 moves to the left, #3 will change sides. No radio calls are required by #2 to change sides as it is the job of #3 to keep #2 in sight and operate as required; if you want to cross sides, just go.
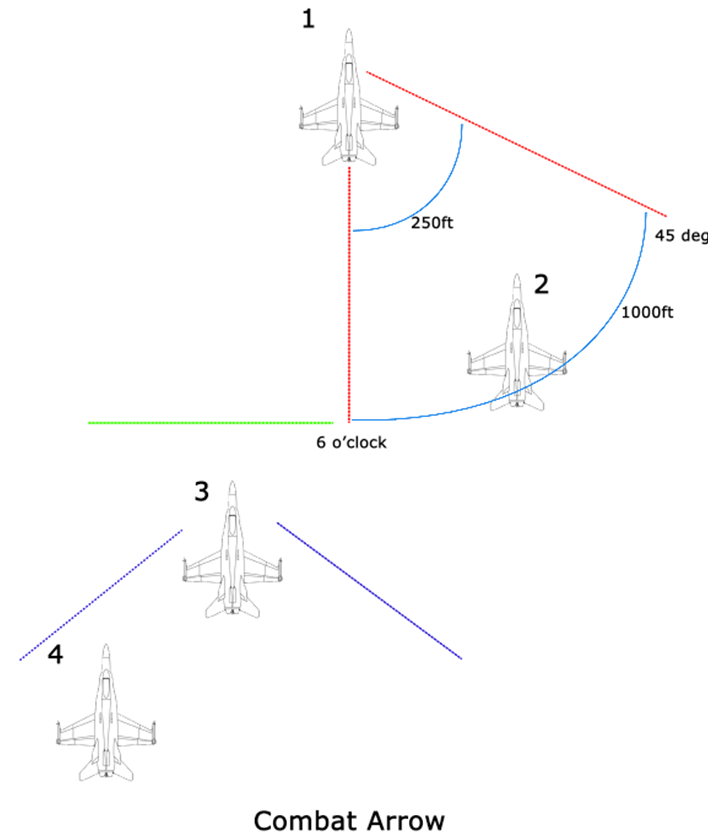
#3 is required to operate on the opposite side of FL’s 6 o’clock to #2. So, if #2 is on leads right, then #3 is required to be to the left of leads 6 o’clock position. If #2 changes sides, #3 must move to the opposite side. In terms of spacing, #3 is simply required to maintain greater than the spacing between lead as #2, plus up to 500ft more. In this way, if #2 changes sides, #3 is going to still be behind #2 (green line in the figure 8). Vertically, #3 may fly slightly below #1 and #2 by a hundred feet or so to assist with maintaining visual.
#4 has a movement cone based on #3 which is between the echelon lines on both sides of #3 (blue lines in figure 8). Spacing from #3 is to be between 100ft and a maximum of 500ft. #4 is not required to be on the opposite side of #3 to which #2 is, although doing so will aid in #4 keeping visual. #4 can change sides at will but must stay in their ‘cone’. Vertically, #4 should not descend below #3 by more than 100ft and must not fly above #3’s altitude.
Combat Spread (pair). In combat spread, #2 flies abeam lead spread by 1nm to 2nm. The default side is #2 on the right, but side changes during the course of the flight are expected. Altitude is usually the same or split (as called by lead). Whilst climbing in spread, there is no requirement to match altitudes.
Turns and manoeuvring in combat spread are as per Chapter 4 and 5 of the T-45 Strike Flight Training Instruction (https://www.cnatra.navy.mil/local/docs/pat-pubs/P-1288.pdf) with the following exceptions:
- F16 and F18 Low Level Navigation speed is 450KTAS and tactical turns are flown at 3g (70 AOB), A10C speed is 300KTAS
- High altitude navigation speed is 300KCAS/0.75M and tactical turns are flown at 2g (60 AOB)
- FL may brief or call for different parameters at their discretion (e.g. heavy weight holding)
Battle Four (Multi-ship Spread). #3 flies spread from #1. #2 flies combat on #1, remaining on the opposite side of #1 to #3 (that is, outside of the spread pair). Similarly, #4 flies combat on #3 and remains outside the spread pair.
Use of Formation Positions. The FL can call for a particular formation (over form common) at any time, however the following are the SOP positions and timings which do not need to be called; wingmen should move to these positions unless these SOPs state or they are told otherwise.
Echelon formation is used initially on departure and then again on arrival through initial for a visual arrival (initial and pitch). Passing initial (on hearing the ‘initial’ radio call by FL), the formation is to automatically re-join the opposite echelon to the pitch direction. For a standard left pitch, re-join right echelon. You will know to expect a right pitch as lead will either brief it or will add the terms ‘Right Pitch’ to the initial radio call.
Combat Arrow is used on departure once in clear air outside of 10nm from the airfield on departure. Do not move to Combat Arrow until called to by lead, either over the formation common radio or by the NOCOM signal. The NOCOM signal is for FL to rapidly break AWAY from wing through 15-20 degrees of heading. The rapid break away is such that #2 and the rest of the formation could not possibly follow lead. When this occurs, the formation separates into Arrow. Once lead has got on to the new heading for a few seconds, expect them to turn back to the departure heading.
Combat Arrow is maintained on transit until entering the area of operations when lead will call the flight in to the required formation. Combat Arrow can be used in tactical scenarios to provide maximum manoeuvring flexibility, particularly at low level. It should be noted however that Combat Arrow is usually not an appropriate formation for BVR air to air combat; spread or battle 4 is highly desirable.
On transit back to base, Combat Arrow is to be used up until after initial on the run in to the pitch.
Spread and battle 4 are used in combat at both low and high level.
14. FENCE CHECKS
FENCE In Checks. FENCE Checks are used to set the aircraft up for combat. There are many variations of what FENCE stands for, but in TGW we use the following:
FIRE CONTROL SYSTEMS – RADAR, Master Mode, Master Arm, RWR, ECM, Countermeasures all set
ENGINE AND FUEL – Engines check and fuel sufficient, Bingo set
NAV – Altimeters, HSD/SA pages set
COMM – Frequencies set, volumes set (think RWR)
EMMITTERS – RADALT, LIGHTS, TACAN, RADAR SIL set
In DCS, there are a few system realism concessions that explain the approach in these checks: unless random damage is modelled, your engine checks should be easy. Also, as of 2.7 Electronic Surveillance is not particularly significant so the RADALT and TACAN can be left on (but lights and SILENT mode on the RADAR need proper consideration – lights should be off).
Lead will, prior to hitting the AO, call on formation common for the formation to ‘FENCE in’. If you have not already done so, conduct the FENCE checks. When you are FENCED in, each wingman in order calls lead on formation common advising FENCED IN with fuel state (in thousands of pounds to one decimal), as follows:
Lead: ‘Crimson FENCE in’
(Delay for checks to be conducted if necessary)
#2: ‘two FENCED in, 9 point 5’
#3: ‘Three FENCED in, 9 point 6’
#4: ‘Four FENCED in, 9 point 5’
#1: ‘Crimson 1’
Do not call ahead of your preceding wingman unless you are prompted to continue by lead.
FENCE Out Checks. When called by lead, or upon exiting the area of operations, use the FENCE checklist to reset systems for arrival. As per the FENCE in, when called by lead, respond ‘FENCED OUT’ in turn with fuel state.
15. AIR TO AIR REFUELLING OPERATIONS
Tanker Re-join. Conducting the tanker re-join as expeditiously as possible. Once in proximity to the tanker, join to observation right position prior to refuelling (if time permits). Observation right is a wide echelon position, with wingmen in echelon on lead (away from tanker). If the refuel is time pressured, re-join straight to the boom pre-contact and call READY PRE-CONTACT.
16. VISUAL APPROACH AND ARRIVAL
Initial and Pitch. Return to base is to be via an initial and pitch as standard. Straight in approaches can be used in inclement weather or for training only.
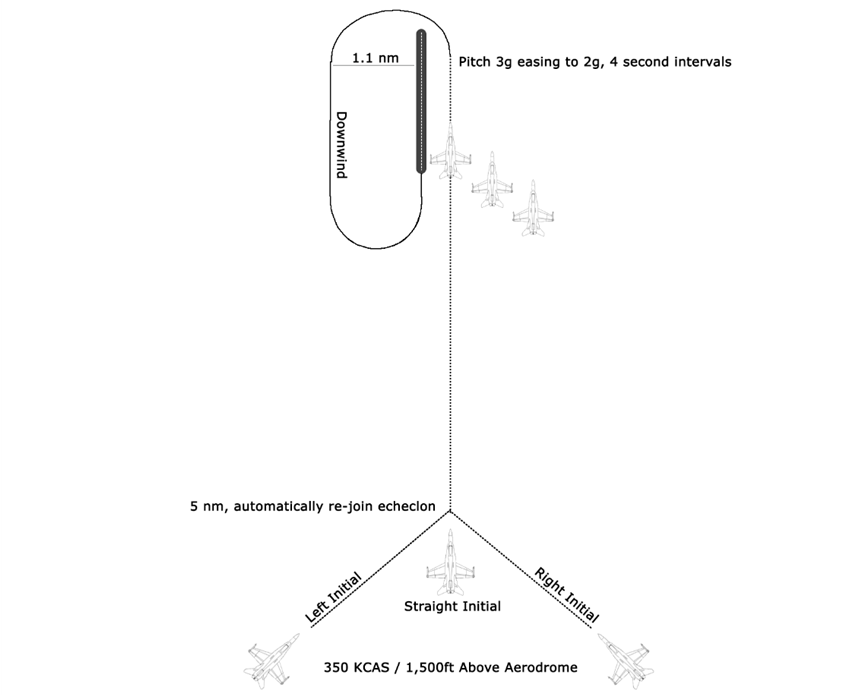
Initial Point. The visual arrival starts from an ‘initial’ point. The initial point is 5nm downwind of the airfield on the extended centreline (slightly on the dead-side), at 1500ft above ground level at 350KCAS (300KCAS A10C). Flight Leads must bring their formation over this point heading to the airfield.
Initial can be approached from within a 45-degree cone pointing at the airfield. If, to line up with initial you need to turn the formation left, you are on a left initial and vice versa. If you are aligned straight with the runway, you are on a straight in initial.
As you arrive at the 5nm initial, Flight Lead must broadcast on the appropriate ATC frequency the initial you are using and for which runway:
#1: ‘Kobuletti traffic, CRIMSON, Left Initial runway 07’
Upon hearing this radio call, the wingmen should promptly (and automatically) move from Arrow into echelon right formation, ready for the pitch. If FL add ‘for Right Pitch’ to the end of the initial call, wingmen should join in to left echelon.
Pitch. The term ‘break’ is also used to describe the pitch. At TGW, either term is fine. Upon arriving over runway (displaced to the dead-side by ~500ft), the FL will initiate the pitch. The pitch is initiated NOCOM by the FL breaking into the circuit. As the lead breaks, the wingman continues straight and begins a mental count, then pitches themselves on the 4th second. Each wingman follows the preceding aircraft by the 4 second interval.
The pitch is flown as a level break turn onto downwind. Roll rapidly to ~70 degrees bank, simultaneously set idle and smoothly pull to a 3g level turn. The g will then gradually need to b reduced through the turn to arrive on the downwind spacing. Reducing the g requires the angle of bank to be reduced to remain level (remember a level 2g turn is 60 degrees angle of bank). Do not use the speed-brake in the pitch as it is not required. The correct spacing is about 1nm. This is the wingtip missile on the runway for an F/A-18 and F-16. Spacing so the wingtip is running down the runway in the A-10C results in a 1.2nm spacing, so flying just inside this picture is acceptable. In any event, if you roll out and your spacing is not the same as lead; adjust it so it is. This will ensure the spacing works for the remainder of the circuit.
Downwind. As soon as you roll out on downwind, configure for landing. In the F/A-18, this means as soon as you are wings level and below 250KCAS, select gear down and full flap then slow to on speed. Again, if everyone does this at the right time, you wont conflict with the aircraft in front of you.
Base Turn. The base turn cue is the runway threshold on the front of the missile. Do not extend the base turn point.
The base turn is flown as a continuous descending turn. There is no ‘wings level’ base leg in a fighter.
Hornet Base Turn. Initially, place the waterline on the horizon which will give you a VV displacement of ~8.5 degrees below the horizon (if you are on speed). After the first half of the turn (if in 2D) or once you detect the angle to the runway threshold is in line with the -5 degree pitch line in the HUD, raise the attitude to place the VV at -5 degrees.
Base Turn Radio Call. On the base turn, the FL will make a base radio call which requires the wingmen to contribute to as follows:
Lead: ‘Crimson base runway 07, Crimson 1 three greens’
#2: ‘two, three greens’
#3: ‘Three, three greens’
#4: ‘Four, three greens’
If ATC are present, the flow is as follows:
Lead: ‘Crimson Base 07’
ATC: ‘Crimson runway 07 cleared to land check wheels’
Lead: ’07 Land, Crimson one three greens’
#2: ‘two, three greens’
#3: ‘Three, three greens’
#4: ‘Four, three greens’
ATC: ‘Crimson’
Note how #2-#4 never say cleared to land; this is the job of the FL only and a clearance for the formation constitutes a clearance for all.
Finals. Rolling out on finals, intercept a 3-degree angle to a point just beyond the piano keys. This will look like the VV being at 3 degrees nose down pitch, with the VV hovering over your aim point just past the piano keys. Do not use the touchdown zone as your aimpoint on a visual circuit as it is designed for precision approaches.
Flare and Landing in the F/A-18. Do not flare on landing if on speed on a three-degree approach angle. Allow the aircraft to land then select idle.
Once on the runway, smoothly lower the nose, speed-brake extend and commence gentle braking as you reintroduce full back stick (to assist with aerodynamic braking).
Braking. Once under 100KCAS, clear of the preceding aircraft and under control, smoothly steer yourself toward the side of the runway your exit taxiway will be on.
If on the landing roll you are going to conflict with the preceding aircraft, move over to the non-exit side, which is called the hot-lane. In the hot-lane, you may overtake the preceding aircraft if you are having difficulty stopping.
17. AFTER LANDING
Exiting the Runway. Upon exiting the runway, safe the ejection seat and follow lead on the taxi back to dispersal or for refuel/re-arm.
If stopping to refuel, ensure you park clear of the runway, clear of runway entry points and taxiways. Using turn around nodes on runway ends to park for refuel/rearm is acceptable.
No radio calls or clearance are required for taxi: the clearance to land constitutes a clearance to taxi in.


